Unit Testing in Unity
I am developing a mobile game in Unity, and it was getting really hard to test it manually. So here's how I introduced unit tests to speed up development.
Developing for Desktop vs Mobile
On desktop, you can get away without unit tests because of how fast you can play test manually. Enter Play mode (Command+P), and within seconds, you can interact with your game on the keyboard and mouse.
On mobile, Unity can't run it in the IDE. It will compile it, install it on your phone then run it. As a result it starts from the starting scene of the game, not the currently open scene. Finally you won't see Debug statements.
Note: after writing this post, I figured out how to simulate touch events in Play mode. See the post.
Creating the test assembly
First I created the Play Mode test assembly. Then I created an empty test following the steps at https://docs.unity3d.com/Packages/com.unity.test-framework@1.1/manual/getting-started.html.
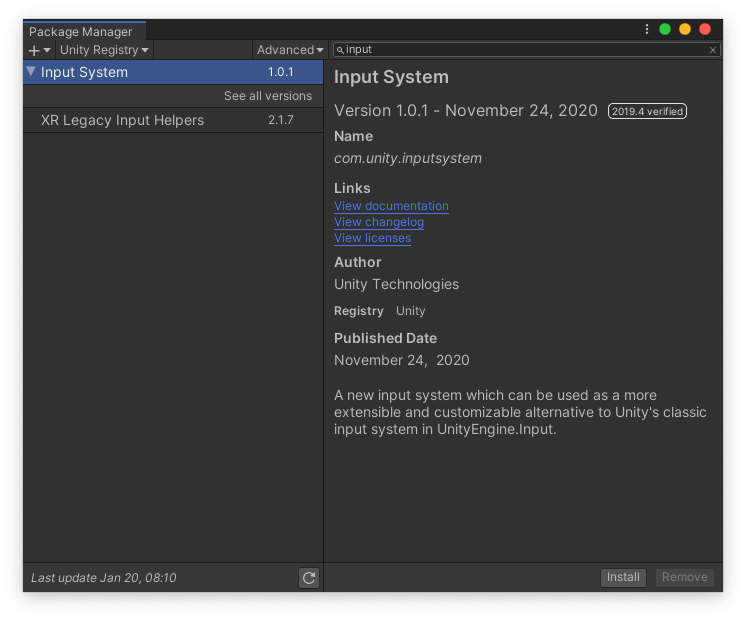
Then I went over to Input Testing to figure out how to simulate inputs. I want to simulate touch events, and see how my gesture recognizer reacts. The doc says to modify manifest.json, but I have no idea where to find that file. Instead I went to the Package Manager and installed it from there.
Upon installing the new Input System, I got this prompt:
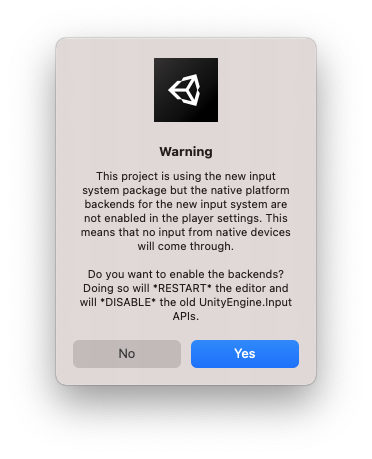
It took a few minutes for Unity to do its work, then relaunch. Then I went over to the Test assembly in the Project window. Upon selection, the details show up in the Inspector. I added Unity.InputSystem and Unity.InputSystem.TestFramework.
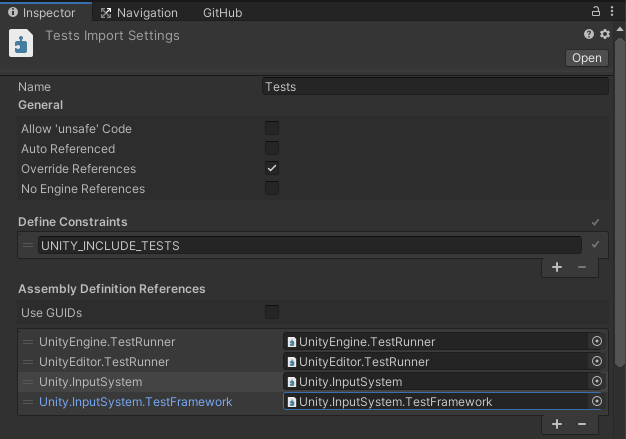
Then I got slightly confused because the doc says to inherit InputTestFixture, but Visual Studio wouldn't recognize this as an existing class. And that's because I had to first click Apply at the very bottom of the window. Not very intuitive!
Upon applying, Visual Studio recognized the Unity.InputSystem package, but still wouldn't discover the InputTestFixture. I re-read the docs, and realized that I had missed step 1. I really do have to add this key/value "for test code that comes with the package to be included with test builds of your project.". After modifying Package/manifest.json, it finally compiled, and I can simulate taps. But how do I test my actual code?
Creating an assembly for the code
To make the Test assembly have access to my Gesture code, I have to create an assembly that contains the Gesture code, then add it to the dependencies of Test. To do this, I referred to https://docs.unity3d.com/Manual/ScriptCompilationAssemblyDefinitionFiles.html#create-asmdef.
First I created a new folder, and made a new assembly asset, then moved the script to it. Unity recognizes that the script belongs to that assembly. Indeed, it started throwing these errors:
- Assets/Gesture/GestureManager.cs(4,7): error CS0246: The type or namespace name 'TMPro' could not be found (are you missing a using directive or an assembly reference?)
- Assets/Gesture/GestureManager.cs(12,16): error CS0246: The type or namespace name 'TextMeshProUGUI' could not be found (are you missing a using directive or an assembly reference?)
Since I'm going to be using unit tests, I don't need them anymore, so I removed them.
Accessing my code from tests
Now that the Gesture assembly is created, I added it to the list of dependencies on my Test assembly. Reloaded the code, and lo and behold, Visual Studio finds the code!

Upon running, I got the following error.
You are trying to create a MonoBehaviour using the 'new' keyword. This is not allowed. MonoBehaviours can only be added using AddComponent(). Alternatively, your script can inherit from ScriptableObject or no base class at all
The proper way to test my GestureManager is to create a GameObject at runtime, add the GestureManager as a component, then test, as demonstrated at https://docs.unity3d.com/Packages/com.unity.inputsystem@1.0/manual/Testing.html#writing-tests.
            var prefab = new GameObject();
            var gestureManagerObject = prefab.AddComponent<GestureManager>();
            var gestureManager = gestureManagerObject.GetComponent<GestureManager>();

            var tapped = false;
            gestureManager.OnTap += (Tap _) => tapped = true;
Upon running, it did not detect the Tap that I was expecting, and that's because I first need to migrate my old code to use the new Input System.
Luckily they wrote a nice page to explain how to migrate to the new system: https://docs.unity3d.com/Packages/com.unity.inputsystem@1.0/manual/Migration.html#unityengineinputtoucheshttpsdocsunity3dcomscriptreferenceinput-toucheshtml.
First they say you should enable touch support by calling InputSystem.EnhancedTouch.Enable(), but the call has actually changed to UnityEngine.InputSystem.EnhancedTouch.EnhancedTouchSupport.Enable().
Firing Update()
Then my GestureManager's Update method wasn't called.
It turned out I had to use this statement: yield return null;, as explained in the boilerplate unit test. By the way, in the docs they use another statement: yield return new WaitForFixedUpdate(); (see https://docs.unity3d.com/2017.4/Documentation/Manual/testing-editortestsrunner.html). Not sure what the difference is.
Firing touch events
Then my Update method would only detect the End phase, not the Start phase. Why is that I called both BeginTouch and EndTouch. No matter which combination of BeginTouch and waits, I did not get it to work.
However, I was able to simulate a BeginTouch event by using the snippet at https://docs.unity3d.com/Packages/com.unity.inputsystem@1.0/api/UnityEngine.InputSystem.Touchscreen.html#UnityEngine_InputSystem_Touchscreen_remarks:
InputSystem.QueueStateEvent(touchscreen,
  new UnityEngine.InputSystem.LowLevel.TouchState
  {
    phase = TouchPhase.Began,
    // Must have a valid, non-zero touch ID. Touchscreen will not operate
    // correctly if we don't set IDs properly.
    touchId = 1,
    position = new Vector2(123, 234),
    // Delta will be computed by Touchscreen automatically.
  });
yield return null;
InputSystem.Update();
yield return null;
No matter how hard I tried, I was not able to use InputTestFixture methods:
// These don't work for some reason.
BeginTouch(0, new Vector2(100, 100), screen: touchscreen, time: 1);
MoveTouch(0, new Vector2(110, 110), screen: touchscreen, time: 1);
EndTouch(0, new Vector2(100, 100), screen: touchscreen, time: 1);
I might be doing something wrong, but at this point, I don't feel like trying anymore. The low-level method will do for now.
Something else I've noticed is that even if I pass startTime to TouchState, it is ignored, and time is computed automatically by InputSystem:
Update: {finger=0 touchId=1 phase=Began position=(100.0, 100.0) time=0}
Update: {finger=0 touchId=1 phase=Moved position=(125.0, 100.0) time=0.0166666666666667}
Update: {finger=0 touchId=1 phase=Ended position=(100.0, 100.0) time=0.0333333333333333}
InputTestFixture not optional
My code runs somewhat ok, but what I've noticed is that sometimes, I may receive a Move event for a certain touch ID without ever catching a Began event even if the doc says otherwise:
Each touch is a single finger contact with at least a beginning point (PointerPhase.Began) and an endpoint (PointerPhase.EndedorPointerPhase.Cancelled).
After I imported the same code to a different project, I realized that it forced me to do the same manifest.json change if I wanted InputTestFixture to be found. I decided I didn't need it since I was manually calling inputs, and not using its utility methods. How was I wrong! At that point, all the events had phase Stationary, and my tests broke. After restoring InputTestFixture, it started working again. The doc for it says:
Use InputTestFixture to create an isolated version of the Input System for tests. The fixture sets up a blank, default-initialized version of the Input System for each test, and restores the Input System to its original state after the test completes.So it is indeed more than just a few utility methods.